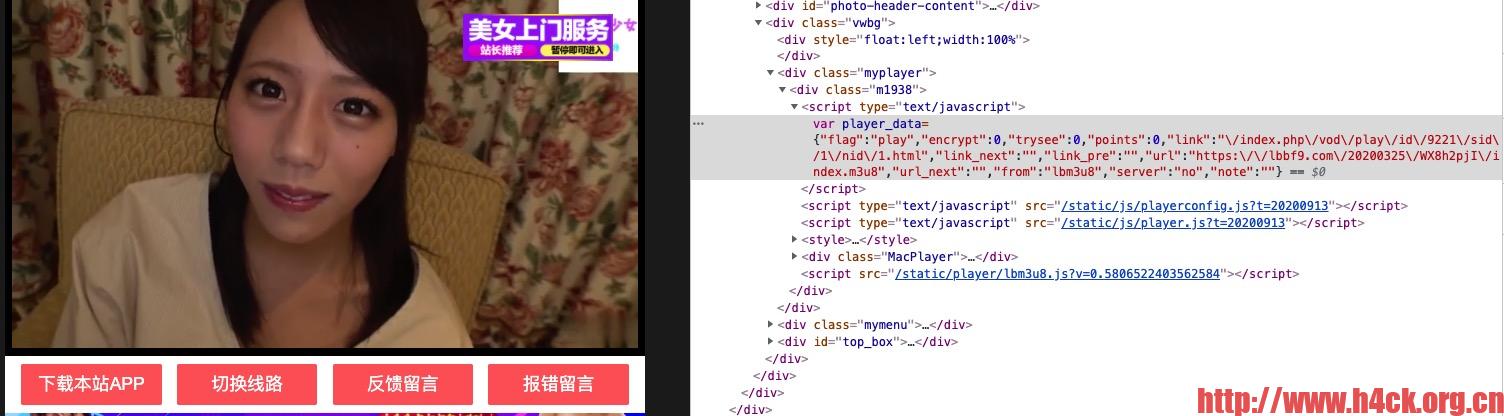
页面代码:
< div class="myplayer" >
< div class="m1938" >
< script type="text/javascript" >var player_data={"flag":"play","encrypt":0,"trysee":0,"points":0,"link":"\/index.php\/vod\/play\/id\/9221\/sid\/1\/nid\/1.html","link_next":"","link_pre":"","url":"https:\/\/lbbf9.com\/20200325\/WX8h2pjI\/index.m3u8","url_next":"","from":"lbm3u8","server":"no","note":""}< /script >        < script type="text/javascript" src="/static/js/playerconfig.js?t=20200913" >< /script >< script type="text/javascript" src="/static/js/player.js?t=20200913" >< /script >
< style >.MacPlayer{background: #000000;font-size:14px;color:#F6F6F6;margin:0px;padding:0px;position:relative;overflow:hidden;width:100%;height:100%;min-height:100px;}.MacPlayer table{width:100%;height:100%;}.MacPlayer #playleft{position:inherit;!important;width:100%;height:100%;}< /style >
< div class="MacPlayer" >< iframe id="buffer" src="" frameborder="0" scrolling="no" width="100%" height="100%" style="position: absolute; z-index: 99998; display: none;" >< /iframe >< iframe id="install" src="" frameborder="0" scrolling="no" width="100%" height="100%" style="position:absolute;z-index:99998;display:none;" >< /iframe >
< table border="0" cellpadding="0" cellspacing="0" >
< tbody >
< tr >
< td id="playleft" valign="top" style="" >< iframe width="100%" height="100%" src="/static/player/dplayer.html" frameborder="0" allowfullscreen="true" border="0" marginwidth="0" marginheight="0" scrolling="no" >< /iframe >< /td >
< /tr >
< /tbody >
< /table >
< /div >
< script src="/static/player/lbm3u8.js?v=0.5806522403562584" >< /script >< /div >
< /div >
Python代码:
from bs4 import BeautifulSoup as bs
import re
import json
import requests

def get_m3u8_link(url):
    # 直接正则匹配
    print('_' * 70)
    print('[A] 解析播放地址......')
    html_doc = get_url_source_code(url)
    bs = BeautifulSoup(html_doc, "html.parser")
    pattern = re.compile(r"var cms_player = {(.*?);$", re.MULTILINE | re.DOTALL)
    surls = bs.find('script', text=pattern)
    js_string = str(surls.text).replace('var cms_player = ', '').replace(';', '')
    json_data = json.loads(js_string)
    m3u8_link = json_data['url']
    title = bs.title.string
    print('[A] 标题:' + title)
    print('[A] 播放地址:' + m3u8_link)
    print('_' * 70)
    return m3u8_link, title